How To Install Apache 2 On Ubuntu 20.04 LTS
It provides the steps required to install Apache 2 Web Server on Ubuntu 20.04 LTS.
Apache Web Server is among the popular web servers and widely-used to host static and PHP based websites. Most of the WordPress sites are being hosted on servers having Apache Web Server. This tutorial provides the steps required to install Apache 2 Web Server on Ubuntu 20.04 LTS. The steps required to install Apache 2 on other Ubuntu versions and Linux systems should be similar to the steps mentioned in this tutorial.
Prerequisites
This tutorial assumes that you have already installed Ubuntu 20.04 LTS desktop or server version either for local or production usage. You can follow Install Ubuntu 20.04 LTS Desktop, Install Ubuntu 20.04 LTS On Windows Using VMware, and Spin Up Ubuntu 20.04 LTS Server On Amazon EC2 to install Ubuntu 20.04 LTS. It also assumes that you have either root privileges or a regular user with sudo privileges.
In case you are installing Apache Web Server for production usage, it assumes that the ports 80 and 443 are publicly open. On AWS EC2, we can explicitly open these ports by updating the security group associated with the servers. Similar to EC2, DigitalOcean (Cloud Firewalls) and UpCloud (L3 firewall) also provide a firewall interface at an additional cost. On other cloud service providers, you may use the standard firewall i.e. UFW (ships by default with Ubuntu) to secure the server. In such cases, enable the appropriate apache profile based on your production usage.
Install Apache 2
This section provides the commands required to install Apache Web Server. Now, execute the below-mentioned commands to install Apache 2 on Ubuntu 20.04 LTS.
# Refresh the indexes
sudo apt-get update

# Install Apache
sudo apt-get install apache2

# Verify Apache
apache2 -version

# Output
Server version: Apache/2.4.41 (Ubuntu)
Server built:   2020-04-13T17:19:17

# Autoclean
sudo apt-get autoclean

# Autoremove
sudo apt-get autoremove
# OR
sudo apt-get --purge autoremove
The above-mentioned commands install the latest version 2.4.41 of Apache 2 while writing this tutorial.
Install Apache 2 Modules
This section provides the commands to install the additional modules including headers and expires. Install the additional modules using the below-mentioned command.
# Install security
sudo apt-get install libapache2-mod-security2

# Enable additional modules
sudo a2enmod rewrite ssl security2 deflate expires headers

# Restart Apache 2
sudo systemctl restart apache2
Verify Installation
Now check the server status on the terminal as shown below.
# Server Status
sudo systemctl status apache2

# Output
● apache2.service - The Apache HTTP Server
     Loaded: loaded (/lib/systemd/system/apache2.service; enabled; vendor preset: enabled)
     Active: active (running) since Tue 2020-06-02 12:14:19 UTC; 5min ago
       Docs: https://httpd.apache.org/docs/2.4/
    Process: 33493 ExecStart=/usr/sbin/apachectl start (code=exited, status=0/SUCCESS)
   Main PID: 33513 (apache2)
      Tasks: 6 (limit: 4622)
     Memory: 26.9M
     CGroup: /system.slice/apache2.service
             ├─33513 /usr/sbin/apache2 -k start
             ├─33514 /usr/sbin/apache2 -k start
             ├─33515 /usr/sbin/apache2 -k start
             ├─33516 /usr/sbin/apache2 -k start
             ├─33517 /usr/sbin/apache2 -k start
             └─33518 /usr/sbin/apache2 -k start

Jun 02 12:14:19 ip-172-31-1-204 systemd[1]: Starting The Apache HTTP Server...
Jun 02 12:14:19 ip-172-31-1-204 systemd[1]: Started The Apache HTTP Server.
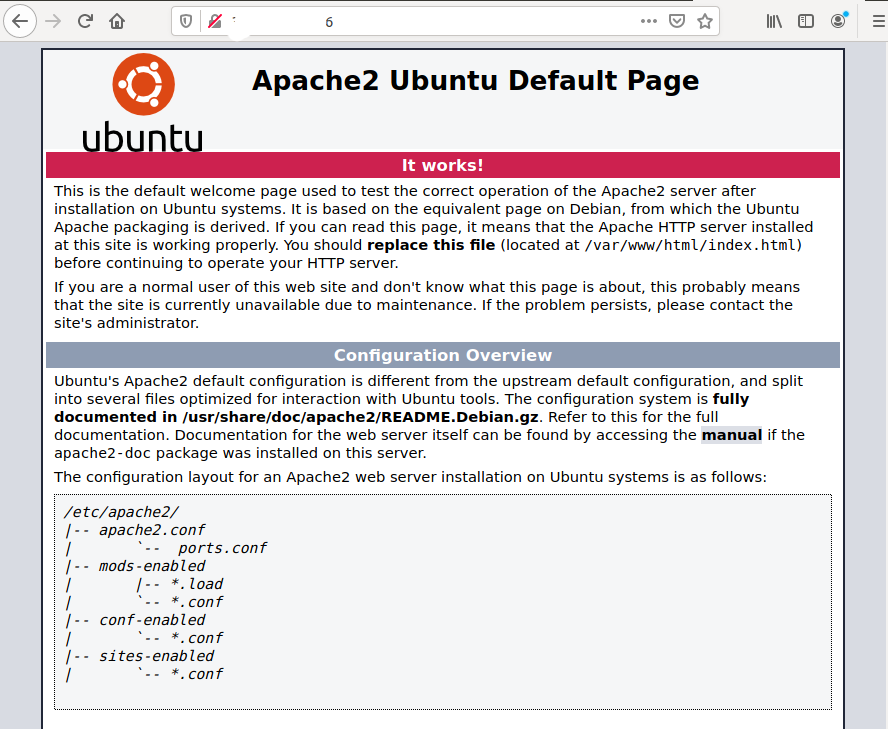
The default www directory used by the Apache Web Server is /var/www/html. Now open the Apache's Home Page in your favorite browser by using the server's public IP address (http://xx.xx.xx.xx) or the DNS name assigned by the service provider. It should show the Home Page similar to Fig 1. It can also be accessed using http://localhost or http://127.0.01 in case it's installed on a local desktop or server system.

Fig 1
Basic Configuration
In this section, we will do some basic configuration specific to performance. These are optional and configure only if required.
Keep-Alive
Configure the keep-alive settings as mentioned below. The actual settings might vary based on your requirements.
# Open apache2 configuration
sudo nano /etc/apache2/apache2.conf


# Check the values of below mentioned options
KeepAlive On
MaxKeepAliveRequests 50
KeepAliveTimeout 5
MPM - Prefork - Optional
With the Prefork MPM, Apache Web Server works in the non-threaded mode which consumes more resources as compared to the Event MPM. The Event MPM is enabled by default in Apache 2 on Ubuntu 20.04 LTS. Also, enable Prefork MPM only if it's really required. Configure the server process as shown below. Change the values based on requirements.
sudo nano /etc/apache2/mods-available/mpm_prefork.conf

<IfModule mpm_prefork_module>
        StartServers            5
        MinSpareServers         5
        MaxSpareServers         10
        MaxRequestWorkers       150
        MaxConnectionsPerChild  0
</IfModule>

# Save the settings

# Disable MPM Event
sudo a2dismod mpm_event

# Enable MPM Prefork
sudo a2enmod mpm_prefork
Production Mode
Update server tokens and signature as shown below. It must be done on production servers.
# Tokens and Signature
sudo nano /etc/apache2/conf-enabled/security.conf

ServerTokens Prod
ServerSignature Off


# Restart Apache 2
sudo systemctl restart apache2
These are the basic steps required to install Apache 2 and the basic configurations that can be applied to it.
Configure Firewall (Production Usage)
If your cloud service provider provides a firewall interface to configure the firewall, and you have configured your server to use the firewall interface provided by the service provider, open the ports 80 or 443 or both based on your server requirements. In case you are not using the firewall interface provided by the service provider and using UFW on your system, you can enable the appropriate profile as shown below.
Notes: It's mandatory to assign Security Group to the AWS EC2 instances and we do not need to configure UFW for EC2 instances for most of the use cases.
# UFW Apache Profiles
sudo ufw app list

# Output
Available applications:
  Apache
  Apache Full
  Apache Secure
  OpenSSH
The Apache profiles can be used to configure UFW as listed below.
Apache Profile - It opens only port 80 to allow unencrypted traffic.
Apache Full Profile - It opens port 80 and port 443 to allow unencrypted and TLS/SSL encrypted traffic.
Apache Secure Profile - It opens port 443 to allow TLS/SSL encrypted traffic.
Now activate the Apache Profile to open the ports 80 and 443 as shown below.
# Activate Apache Full Profile
sudo ufw allow 'Apache Full'

# Check Apache Profile
sudo ufw status

# Output
Status: active

To                         Action      From
--                         ------      ----
OpenSSH                    ALLOW       Anywhere
Apache Full                ALLOW       Anywhere
OpenSSH (v6)               ALLOW       Anywhere (v6)
Apache Full (v6)           ALLOW       Anywhere (v6)
We can see that the Apache Profile is activated and open to accept connections from anywhere.
Basic Commands
This section explains the basic commands available in Ubuntu, and specific to the Apache Web Server installed by us.
# Server Status
sudo service apache2 status
# OR
sudo systemctl status apache2

# Stop the Server
sudo service apache2 stop
# OR
sudo systemctl stop apache2

# Start the Server
sudo service apache2 start
# OR
sudo systemctl start apache2

# Re-start the Server
sudo service apache2 restart
# OR
sudo systemctl restart apache2

# Reload the Server
sudo service apache2 reload

# Enable Site
sudo a2ensite <config name>

# Disable Site
sudo a2dissite <Config Name>

# Enable Module
sudo a2enmod <module name>

# Disable Module
sudo a2dismod <module name>
We must always use the reload command to apply the site configurations without disrupting the active sessions.
Configure Virtual Host (Production Usage)
We have to configure the virtual host to use the domain name for production usage so that the Website or Application is publicly accessible using the domain name. This prevents the usage of IP addresses which are hard to remember. Also, we can use the same IP address to configure multiple virtual hosts. You can follow Configure Virtual Host On Apache to configure the websites for production usage.
We can use aliases on the local system instead of virtual hosts.
Secure Apache (Production Usage)
You can further secure the websites and web applications deployed on Apache using the SSL certificate. The most commonly used service for SSL certificates is Let's Encrypt. You can also follow How To Install Let's Encrypt For Apache On Ubuntu and Redirect HTTP to HTTPS on Apache to secure your websites using Let's Encrypt.
Summary
This tutorial provided the steps required to install Apache Web Server on Ubuntu 20.04 LTS.


